Ctrl+K

Arduino and ESP32

Site Navigation

  • Arduino Notebook
  • ESP32
  • Boards and Peripherals
  • Temperature Control

Site Navigation

  • Arduino Notebook
  • ESP32
  • Boards and Peripherals
  • Temperature Control

Section Navigation

  • Start
    • 如何开始
    • Using the Arduino IDE
    • Include Arduino Libraries
    • Troubleshooting Arduino Sketches
    • Burn Bootloader 的方法
    • How To Read Arduino Power Trees —— Arduino Documentation
    • Debugging Fundamentals —— Arduino Documentation
    • Installing additional cores —— Arduino Documentation
    • Bluetooth® Low Energy —— Arduino Documentation
    • The Arduino Guide to Low Power Design —— Arduino Documentation
    • Multimeter Basics —— Arduino Documentation
    • The Arduino Guide to Soldering —— Arduino Documentation
    • Guide to 3V3 and 5V Power Supplies Differences —— Arduino Documentation
  • Language
    • Arduino API —— Arduino Documentation
    • Arduino Reference Home Page
    • Built-in Examples —— Arduino Documentation
    • pinMode() - Arduino Reference
    • digitalRead() - Arduino Reference
    • digitalWrite() - Arduino Reference
    • Save long int and float in EEPROM
    • Float Datatypes
    • 字节内的比特交换之蝶式算法
    • PRJ - Byte Type
    • PRJ - High Byte
    • PRJ - Swap Bits Lf
    • print function usage
    • sprintf function usage
    • 如何在程序空间保存大量常量数据?
    • PRJ - Print Format
    • PRJ - Write Float Union
    • PRJ - Write Int Float With Pointer
    • PRJ - Write Int Union
    • PRJ - Write Vs Print
    • string - Arduino Reference
    • String() - Arduino Reference
    • String startsWith and endsWith Functions —— Arduino Documentation
    • String Character Functions —— Arduino Documentation
    • PRJ - Arrays Of Strings
    • 用typedef声明新类型名
    • PRJ - Typedef Naming A Type
    • Using Variables in Sketches —— Arduino Documentation
    • 如何在 setup() 和 loop() 之间传递信息?
    • How to define a class in Arduino?
    • PRJ - Addtwolib
    • PRJ - F Macro
    • PRJ - Place Const In Program Memory 2
    • PRJ - Place Const In Program Memory
    • PRJ - Progmem Example 1
  • GPIO
    • PRJ - Digital Read Serial
    • PRJ - Blink
    • PRJ - Analog Read Serial
    • PRJ - Fading a LED
    • PRJ - Debounce on a Pushbutton
    • PRJ - State Change Detection (Edge Detection) for pushbuttons
    • PRJ - Simple keyboard using the tone()
    • PRJ - Tone on Multiple Speakers
    • PRJ - Pitch follower using the tone() function
    • PRJ - Play a Melody using the tone()
  • Timer
    • Introduction to Arduino Timer
    • Arduino I2C + DS1307实时时钟
    • PRJ - Blink Without Delay
  • Serial
    • Arduino Serial: Introduction, Serial Monitor
    • Arduino Serial
    • Arduino 串口通信 (转)
    • Serial Call and Response (handshaking) —— Arduino Documentation
    • How to Wait for Input in Arduino
    • 接收随机数据
    • Uart Ttl Rs232 Rs 485
    • How to monitor the serial port in Linux - zz
  • I2C
    • Introduction to I2C
    • How to Learn I2C with Arduion
    • Arduino – Wire 库(中文文档)
    • Wire Guide - A Guide to Arduino & the I2C Protocol (Two Wire)
    • Software I2C
    • 两块UNO通过IIC进行板间通讯
  • SPI
    • Introduction to SPI
    • 两个 arduino 间的 SPI 通信
    • Arduino SPI + SPI Flash芯片W25Q80BV
  • Can-Bus
    • CAN Bus with Arduino
    • Arduino CAN Tutorial - Interfacing MCP2515 CAN BUS Module with Arduino
    • Arduino Can Bus shield
    • PRJ - CAN Master
    • PRJ - CAN Receiver
  • Communication
    • Stream
    • 调试通信协议
    • 1-Wire Protocol —— Arduino Documentation
    • Inter-Integrated Circuit (I2C) Protocol —— Arduino Documentation
    • LPWAN (Low-Power Wide-Area Networks) 101 —— Arduino Documentation
    • The Arduino Guide to LoRa® and LoRaWAN® —— Arduino Documentation
    • Arduino & Serial Peripheral Interface (SPI) —— Arduino Documentation
    • Universal Asynchronous Receiver-Transmitter (UART) —— Arduino Documentation
  • Ethernet
    • Ethernet-Shield-rev2
      • Readme - Ethernet Shield Rev2 tutorials
      • PRJ - Ethernet Shield Chat Server
      • RRJ - Chat (Telnet) Client
    • Ethernet - JSON Application
    • Web Server Multiple Pages
    • Arduino Ethernet Web Server Relay —— Random Nerd Tutorials
    • Ethernet
    • Arduino - Ethernet Shield 2 —— Arduino Tutorial
    • Webserver with an Arduino
    • Ethernet - Reference
    • Ethernet - server.accept() - Reference
    • Ethernet - EthernetServer() - Reference
    • EthernetClient() - Reference
    • Web Server Password — Tutorial
    • Ethernet - client.stop() - Reference
  • WiFi
    • Start Arduino Wifi
    • Arduino WiFi Shield
    • Getting Started with the Arduino WiFi Shield
  • LED Display
    • LED 的 595 串并转换驱动方案
    • 7 Segment LED
    • LED Matrix
    • 无延迟刷新技术
    • 多块 8x8 LED Matrix 的级连方法
    • WS2812
  • LED595
    • PRJ - Led595
    • PRJ - Led595 2
    • PRJ - Led595 2 Counter
    • PRJ - Led595 2 Counter 2
  • EEPROM
    • Introduction to EEPROM Libraries
    • Arduino EEPROM Library
    • Arduino I2C + AC24C32 EEPROM (Easy Start)
    • reading-and-writing-serial-eeproms (全面)
  • Keypad
    • Intro to Keypad
  • LED Display
    • LED 的 595 串并转换驱动方案
    • 7 Segment LED
    • LED Matrix
    • 无延迟刷新技术
    • 多块 8x8 LED Matrix 的级连方法
    • WS2812
  • MultiFunctionShield
    • Arduino 多功能扩展板
  • Player-mini
    • Reference
  • Wire-AM2321
    • 使用Arduino Wire Library读取温湿度传感器AM2321
  • GPS
    • GPS Library
  • FFT
    • FFT
  • Arduino Notebook
  • GPIO
  • PRJ - Blink

PRJ - Blink#

2024-05-29

From: Blink | Arduino Documentation

电路连接#

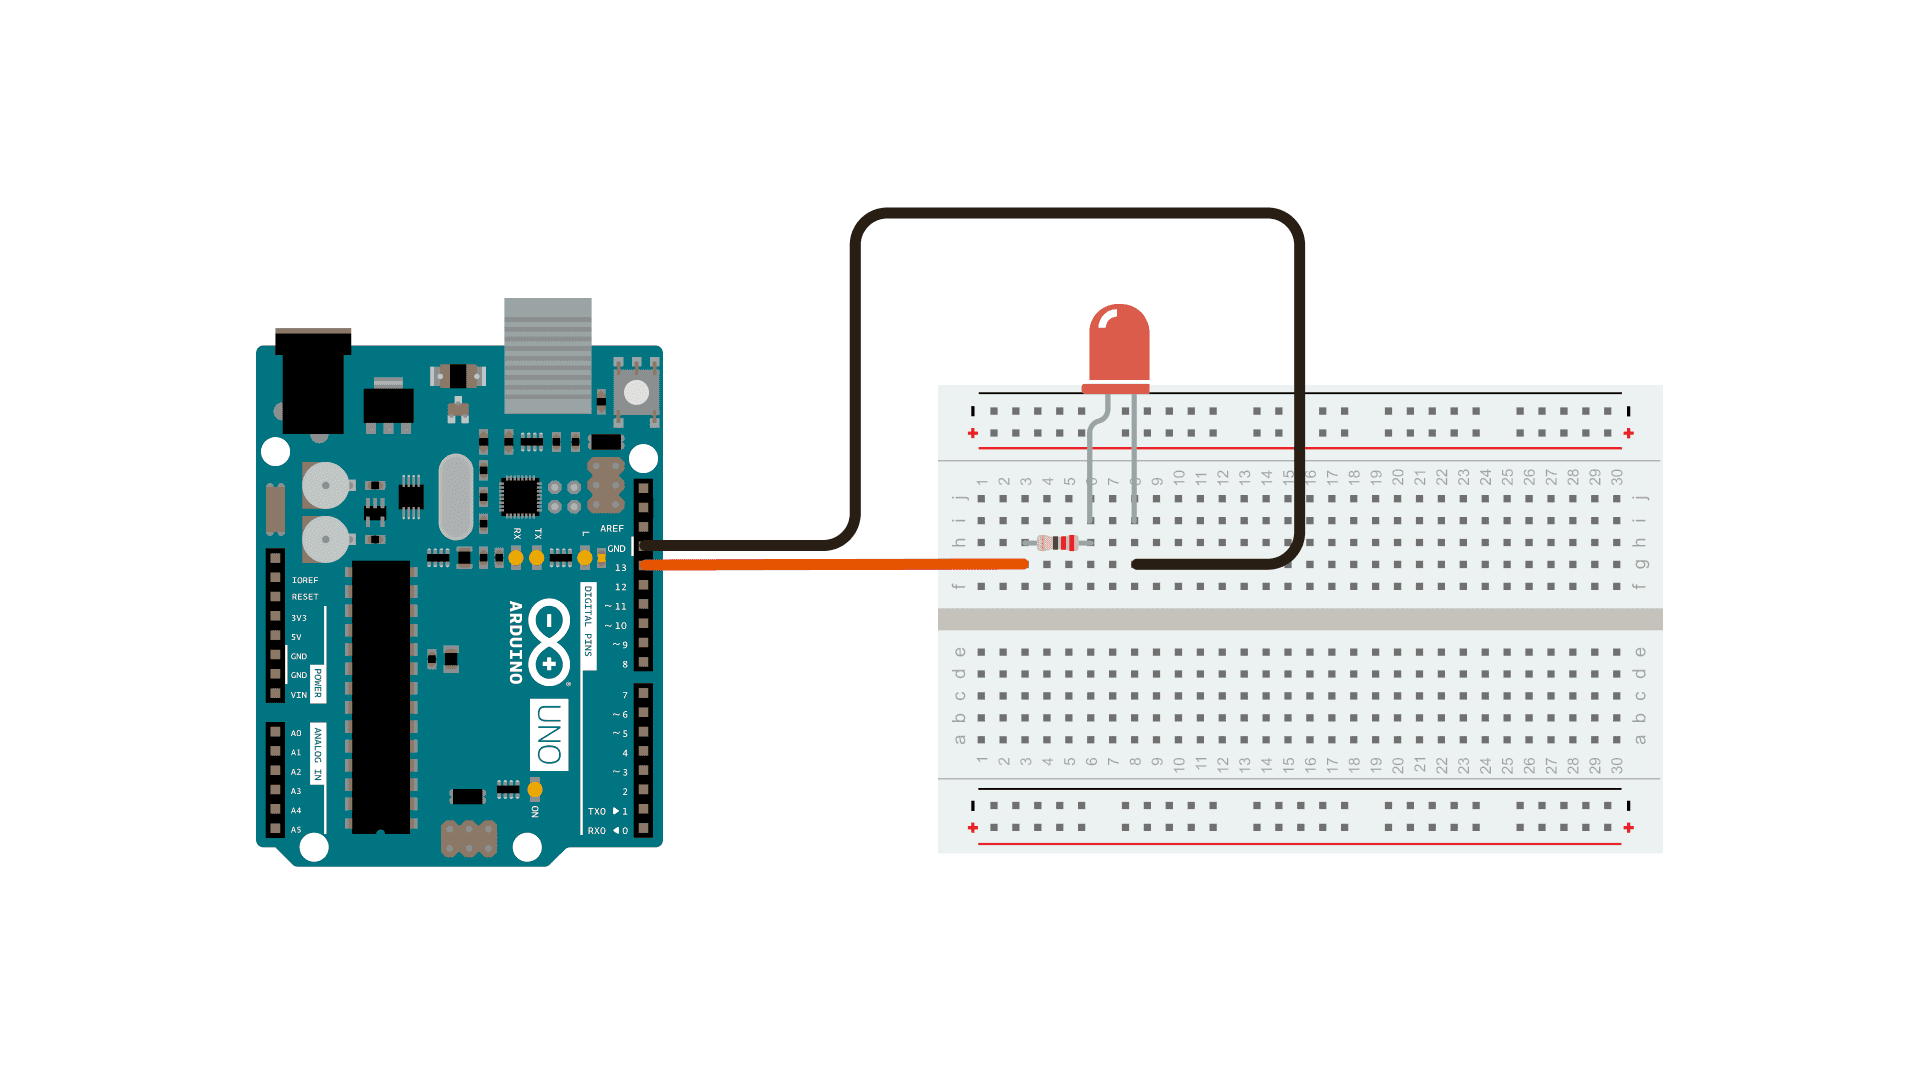
13 引脚连接(驱动) LED。串接限流电阻。

为了方便,该 LED 是集成在板上的。所以此实验实际不需要外接电路。

Code#

LED_BUILTIN 是什么? 是 13 吗? 13 是外置的,还是板上 LED?

/*
  Blink

  Turns an LED on for one second, then off for one second, repeatedly.

  Most Arduinos have an on-board LED you can control. On the UNO, MEGA and ZERO
  it is attached to digital pin 13, on MKR1000 on pin 6. LED_BUILTIN is set to
  the correct LED pin independent of which board is used.
  If you want to know what pin the on-board LED is connected to on your Arduino
  model, check the Technical Specs of your board at:
  https://www.arduino.cc/en/Main/Products


  https://www.arduino.cc/en/Tutorial/BuiltInExamples/Blink
*/

// the setup function runs once when you press reset or power the board
void setup() {
  // initialize digital pin LED_BUILTIN as an output.
  pinMode(LED_BUILTIN, OUTPUT);

  Serial.begin(9600);
}

// the loop function runs over and over again forever
void loop() {
  digitalWrite(LED_BUILTIN, HIGH);      // turn the LED on (HIGH is the voltage level)
//  delay(1000);                        // wait for a second
  delay(200);
  digitalWrite(LED_BUILTIN, LOW);       // turn the LED off by making the voltage LOW
  //  delay(1000);                      // wait for a second
  Serial.println(LED_BUILTIN);          // 1
  delay(1000);                          // 2
}
  1. 从调式串口打印 LED_BUILTIN 的值,看到 UNO 的确实是 13。

  2. 改变 delay() 的时长,观看板上 LED 闪烁的频率与占空比。

上一页

PRJ - Digital Read Serial

下一页

PRJ - Analog Read Serial

On this page
  • 电路连接
  • Code

© Copyright 2023, Dai.

由 Sphinx 6.2.1创建。

Built with the PyData Sphinx Theme 0.13.3.